Make your own › Wedding invitation maker › Guide
Make your own wedding invitation maker
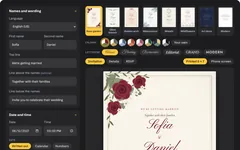
You don't need to know how to code. You describe each part to a free AI assistant such as Claude, ChatGPT or Gemini, paste what it writes into a file, and open it in your browser. Want to see the finished one first? Try the wedding invitation maker.
 Try the finished wedding invitation maker →
Your own invitation maker, designed your way
You'll describe the invitation maker to a free AI assistant, paste what it writes into a file, and open it in your browser. Then add designs, a matching set of cards, downloads and a link to send, one step at a time. It's a great way to get the exact look you want, instead of the nearest template.
- A form for your names, date, places and wording, with the card updating as you type
- Flowers, leaves and gold frames drawn by the browser, with no picture files
- Colour sets and lettering styles you can switch between
- A matching details card and RSVP card
- High-quality images and a printable PDF with cut marks
- A digital invitation link with an RSVP form that sends replies to your WhatsApp or email
Good for: couples who want invitations that look made for them without paying for a stationery site, and anyone helping a friend or family member with theirs. The same maker works for engagement parties, vow renewals and anniversaries.
What you need
Build it in six steps
Step 1 gives you a simple version that works, and each step after it adds more. The maker on the wedding invitation maker page is roughly what you'll have once you've done every step. Yours will look a bit different, because the AI writes its own version each time.
Ask for a one-card invitation maker
Copy this prompt into your AI assistant:
Copy this promptI don't know how to code. Please make me a wedding invitation maker that runs in a web browser. Requirements: - ONE single HTML file (HTML, CSS and JavaScript together), no external libraries. I will save it and double-click it. - A form on the left: our two first names, a line above the names (e.g. "Together with their families"), a line below them (e.g. "invite you to celebrate their wedding"), the date, the time, the place and its address. - On the right, a preview of a 5 by 7 inch portrait invitation card that updates as I type. - Write the date out in full, like "Saturday, 12 June 2027". If a box is empty, leave that line off the card. - Make it elegant: a warm ivory background, a thin gold double border, lots of white space, everything centred. Use the Google Fonts "Pinyon Script" for our names and "Cormorant Garamond" for everything else. - Fill the form with a made-up example couple so I can see it working straight away. Please give me the complete file in one code block, then tell me in simple steps how to save and open it.
Copy the code, paste it into your text editor, and save it as invitation-maker.html. Double-click it and type your own names to see the card change.
Add flowers, designs and colours
This is the fun part. The browser can draw roses, leaves and gold lines itself, so you don't need any picture files.
Copy this promptThat works, thank you. Now please add designs, drawn with inline SVG (no image files): 1. "Rose garden": bouquets in the top-left and bottom-right corners, with deep red roses (seen from above, with petals spiralling into the centre), small white five-petal flowers, olive-green leafy branches and a few berries. 2. "Olive branch": two olive sprigs meeting at the top centre, and a smaller pair at the bottom. 3. "Golden arch": a tall arch outline in thin gold lines with a soft tint inside and a small cluster of flowers at the top. 4. "Modern": no flowers, just a thin line border and big, clean lettering. Add buttons with a tiny preview of each design. Add colour sets I can click (Burgundy and olive, Sage and gold, Dusty blue, Terracotta, Blush, Navy and gold), and let me pick my own colours for the paper, the words, the names, the flowers, the leaves and the gold lines. Give the paper a very subtle grain so it looks like real card. Send me the complete updated file.
Always ask for the complete file. Replace everything in invitation-maker.html, save, and refresh the tab (F5 or Cmd+R).Make a matching set of cards
Most invitation suites have more than one card. Putting the practical details on their own card keeps the main invitation clean.
Copy this promptPlease turn it into a set of three matching cards, with tabs above the preview to switch between them: 1. The invitation (what we have now), plus an optional quote or verse at the bottom. 2. "The details": the ceremony and the reception side by side with a thin gold line between them (time, place and address for each), the order of the day (one line each), the dress code with a row of coloured circles showing colours we'd like guests to wear, and a note about gifts. 3. "RSVP": "Kindly reply by [date]", how to reply (WhatsApp number, email or a website), and a closing line, "We can't wait to celebrate with you". Add form sections for all of these, and tick boxes to leave the details or RSVP card out. If the words don't fit on a card, shrink all the text a little at a time until they do, and balance wrapped lines so they're roughly the same length. Send me the complete updated file.
Download images and a printable PDF
Copy this promptPlease add downloads: - Draw each card on a canvas, so what I download looks exactly like the preview. Draw the SVG artwork first, then the words on top, and wait for the fonts to load before drawing. - "Download this card" saves a PNG at 1500 by 2100 pixels (5 by 7 inches at 300 dpi). - "Download PDF" uses the pdf-lib library from a CDN to make a PDF, with a choice of: two copies per A4 sheet (landscape) with small grey cut marks at the corners; the same for US Letter; or one 5 by 7 inch card per page for a print shop. - Add a "Phone screen" option that changes the cards to a 9:16 shape for sending as pictures. Send me the complete updated file.
If the PDF button does nothing, open the file while you're online, because pdf-lib downloads the first time it's used.Send it as a link that guests can reply to
This is what stationery sites charge for. Because the details travel inside the link, you don't need a server or a database.
Copy this promptPlease add a digital invitation: - A "Get the invitation link" button. Turn all my settings into JSON, compress it with CompressionStream("deflate-raw"), encode it as URL-safe base64 and put it at the end of the page's address after "#view=". - When the page opens with "#view=" in the link, hide the form and show only the invitation: a closed envelope in my colours with a wax seal showing our initials and "Tap to open". When tapped, the flap opens and the cards slide out, one under the other. - Under the cards, buttons for: "Reply to the invitation" (a short form: names, yes or no, how many, meal choice, dietary needs and a message, which then opens WhatsApp with wa.me or an email with mailto: to me, with all the answers written out), "Add to calendar" (an .ics file, plus a Google Calendar link) and "Directions" (a Google Maps search link for each address). - Show how many days are left until the wedding. - Buttons to copy the link and send it on WhatsApp or by email, and a QR code on the RSVP card that opens the reply. Send me the complete updated file.To share the link, the file has to be online. Put it up for free with Netlify Drop or GitHub Pages, then make the link from the online copy.Other languages, and phones
Copy this promptPlease finish it off: - Add a language menu: English, English (US), Spanish, French, Portuguese, Italian and German. Translate every fixed word on the cards and on the guest page (headings, "Kindly reply by", the reply form and the buttons). Write dates and times with Intl.DateTimeFormat in that language, and let me choose a 12-hour or 24-hour clock. - Add two more date styles: "Calendar" (the month on top, then WEEKDAY | 12 | TIME in a row with fine gold lines, then the year) and "Numbers" (12 · 06 · 2027). - Save my answers in localStorage so they're still there next time, with a "Start again" button. - Make it work on a phone: the preview first, then the form in sections I can open and close, nothing scrolling sideways, and buttons big enough to tap. Send me the complete updated file.
Quick fixes
The downloaded image uses plain fonts
The canvas drew the words before the fonts had loaded. Tell the AI: "Before drawing on the canvas, wait for document.fonts.load() for each font I use, then draw again when document.fonts.ready finishes."
The flowers look like blobs
Ask for more detail on one thing at a time, for example: "Draw each rose as a cup of five overlapping petals with a lighter edge, then six curved petal edges spiralling into a dark centre, each with a thin shadow inside it." Upload a screenshot of what you have and say what's wrong.
The printout is the wrong size or cut off
In the print window, set the scale to 100% (or "Actual size"), not "Fit to page". Check the paper size matches the PDF, A4 or US Letter. If the edges are cut off, your printer can't print right to the edge, so ask the AI to make the cards a few millimetres smaller with a white margin.
The invitation link is very long
That's normal, because the whole invitation is inside it. WhatsApp and email handle long links fine. If you want a short one for a printed card, ask the AI to point the QR code straight at your WhatsApp number (wa.me) or your reply form instead.
The link opens a blank page for guests
The file has to be online for a link to work. Put it on a free host first (step 5), then make the link from the online copy, not from the file on your computer.
It opens as text
Re-save as plain text with exactly .html at the end, not .txt.
Twist it into something else
The same designs, cards and link work for lots of other occasions. Change the first prompt to make:
Save the date cards
a single card with your names, the date in big numbers and "Formal invitation to follow", sent a year ahead
A wedding day signage set
a welcome sign, table numbers, a seating plan and a bar menu, all in the same design, printed large
Thank-you cards
a folded card with a photo space on the front and a short message inside, ready for after the honeymoon
A birthday or christening invitation
the same envelope link and RSVP form, with balloons or a baby's name instead of flowers
An order of service
a booklet with the readings, music and vows, printed two pages per sheet and folded in half
A guest list tracker
paste in your RSVP messages and it counts who's coming, meal choices and dietary needs
The look you want, at no cost
Printed invitations from a stationer can easily cost a few pounds, euros or dollars each, and many online invitation sites charge to remove their logo, unlock the nicer designs or send digital invitations. Making your own means the design is exactly yours, you can reprint as many as you need, and the same file can make your thank-you cards and signs later.
Questions about making your own
Can I add a photo of us?
Not in this maker, which keeps to illustrated designs. If you'd like one, build your own with the steps above and ask the AI to "add a round photo frame above our names, filled with a photo I choose from my computer".